Pink! Noise that is….

I do home recording as a hobby, and this year I finally got around to buying some studio monitors with some decent low-end.  I’ve been doing home recording since the mid-1990s, so this was long over due.  Except for the first few years of this endeavor, I had decent rooms to record in with some purpose built and actually quite lucky features in the rooms that make recording and mixing enjoyable.

In this post, I’m going to walk you through the process I followed to set up the monitors, then ‘pink’ the room with pink noise to see what the room response was at my listening position, and then how I flattened out the room a little bit with EQ.  Along the way, I’ll show you some of the cool features I added to this room for usefulness as a home studio tracking and mixing room.

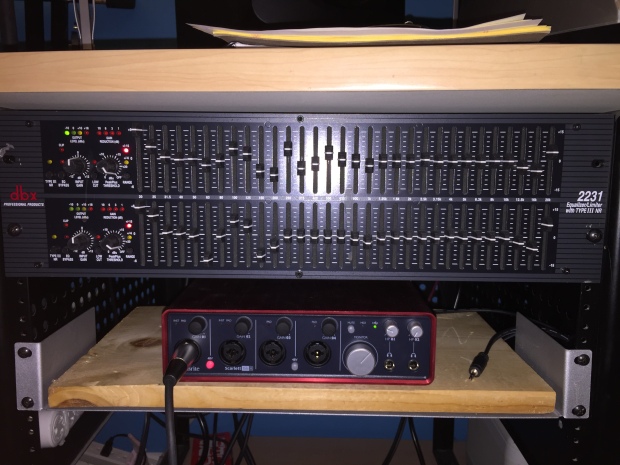
There’s a few concepts that are essential to understand to take this on in your home studio.  The first is that of ‘pink’ noise.  Pink noise is a random noise that has equal energy per octave band.  Since I have a 31 x 1/3 octave band EQ in my rack between my audio interface and my monitors, I’m going to use 1/3 octave analysis to check how my monitors respond in my room to pink noise.  Pink noise sounds quite a bit like tuning into static on the radio – for those of you that still have a way to do that!

I won’t steer you to the wikipedia article on pink noise – I’ve studied acoustics as part of my profession as an engineer, and I’ll say that the wikipedia article is very ‘scholarly’.  Instead of pointing you there, this article at Sweetwater is a nice and tidy description of why pink noise has significance in eq setting.

So, my first step in equalizing my monitors in my room was to go get some pink noise.  I was specifically looking for uncorrelated pink noise as a stereo .wav file.  Why ‘uncorrelated’?  What this means, for all practical purposes, is the pink noise randomness in the left channel, is not time correlated with the pink noise randomness in the right speaker.  If the left and right channels were correlated, then I could get some potential comb filtering stuff going on with reflections in the room as I set the eq.  Comb filtering is a nemesis of setting up speakers for monitoring resulting from reflections of a wave arriving slightly time delayed at the ear, compared to the direct sound – as the path is just ever so slightly longer reflected than direct.  This has a phase cancellation result that is audibly strange and not suitable for mixing.

I found the uncorrelated pink noise in a nice package of test signals at Dynaudio.  Read their page, then go to the bottom and hit the .zip download link.  This .zip file has all kinds of useful test .wav files.

With the pink noise in hand, time to turn attention to speaker placement.  The monitors that I purchased recommended a 60 degree toe-in as a starting point as well as experimenting with the lateral distance between the speakers.  I placed the monitors at the edges of my desk.  To set the toe-in, I printed off a 30/60/90 degree triangle and cut out the triangle shape.  Here’s a couple of photos of using the triangle with the back edge of the desk as a reference; first setting toe-in of the right, then the left monitor.  The view is looking down on the desk and aligning the side of the monitor with the 60 degree angle formed by the back of the desk and the monitor.  Now, some of you that have some big rooms, you immediately notice my violating a practice of monitor placement – and that is trying to keep them away from the wall behind them.  This room is only 11′ from the blue wall you see to the wall behind the listening position.  I wouldn’t mind a larger room, but it isn’t going to happen!

The monitors do have a selectable gain shelving filter switch on the back and I ended up leaving in the as shipped position for now.

I also see lots of fancy monitor isolation out there on the market.  Most of the isolators sold for monitors talk about isolating the low frequencies from the desk.  You can do this quite expensively (one set of isolators I found actually cost more than I paid for the monitors themselves).  Or you can take a home-recording-on-the-cheap approach like I did – which was look for some alternative isolation.  I used a highly scientific method to determine the isolation effectiveness of my isolators – I played the same song, at the same level, directly on the desk and then on the isolators and felt for the amount of low frequency vibration that could be felt on the desktop in both situations.  I can say that my isolators are VERY effective at reducing the low frequency vibration transferred to the desktop.   I bought them at Harbor Freight Tools.  Yes, the place that smells of cheap vinyl-based rubber.  In fact, the isolators I bought could be responsible for a great deal of that smell at Harbor Freight.  What did I use?  I bought some 10″ diameter pneumatic wheels and removed the center steel wheel portions – so I have just the tire with inner tube inserted.  Here’s some shots before and after removing the center steel portion.  Total outlay for these: $8.

For now, I have placed the monitors on a piece of thick paper towel on top of the tires – ok, time to be honest, they are tires, but they are really pretty great isolators.  I will eventually replace the paper towel with some nice looking fabric.

Now back to the pink noise.

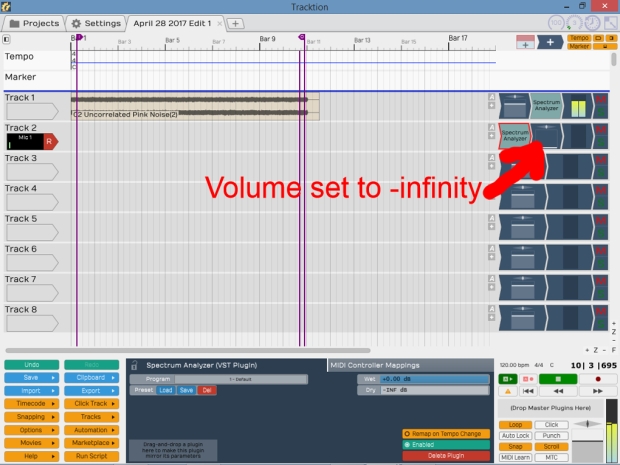
I loaded the pink noise .wav file into a track in my DAW (I use Tracktion 6 – which is completely and entirely free to use, no nag screens, no limitation to use just it’s built in effects, etc. ) and put an instance of the very excellent Spectrum Analyzer VST from Seven Phases on the output of the track.  This plugin uses actual digital filter implementation of the 1/3 octaves, instead of the much more common FFT method.  There are several technical reasons why this is a superior way to measure 1/3 octave levels which I could go into but I would bore those of you still reading this very long post – so I won’t do that but just say that a proper Real Time Analyzer (RTA) almost all use digital filter method over FFT for 1/3 octave analysis.  This plugin has very simple controls and provides real-time display of the 1/3 octave level (blue bars), a curve representing a delay-faded peak value (top curve) and most importantly, an average of the 1/3 octave level represented by the bottom curve.  Here is the output of the analysis just operating on the .wav file loaded into the first track on my DAW.

pink noise file

As you can see by the average line (the one below the tops of the blue bars) this pink noise file is danged close to a perfect pink noise file with the very flat average line.

Next is to set up the analysis microphone (I borrowed a dbx measurement mic from my church) at my listening position, and make sure that the signal being recorded by the mic is only being sent to the analysis plugin and not feeding back out to my speakers.

This is a picture of the mic at the listening position (have it set pretty much at ear level, at the center of where my head would be in the listening position).

measurement mic at ear height in listening position

And here is the screenshot of my DAW setup – pink noise file on looped playback in top track, and the microphone set to gain so that I was getting a solid green but no amber/red peaks on that channel, and noting that the spectrum analysis is BEFORE my volume fader on that channel, which is set to -infinity.

daw setup annotated.jpg

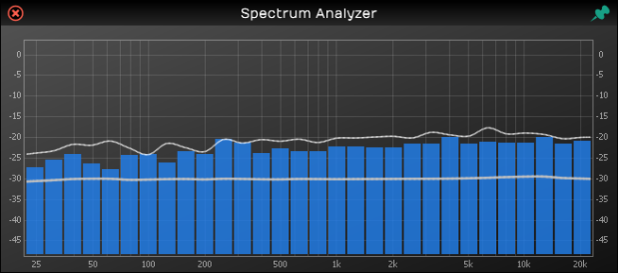
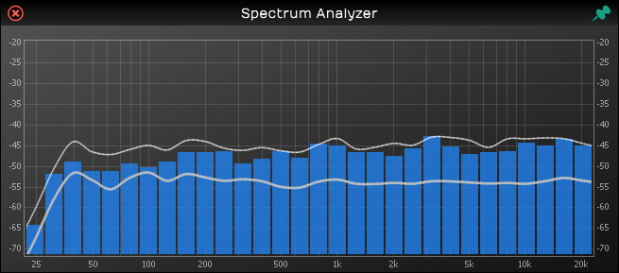
Checking to see what the mic was seeing with the spectrum analysis without applying any EQ, here is what the pink noise played through my monitors, and picked up at the listening position looked like.

Before EQ

This was a bit flatter than I expected, but still, not the table flat response of the pure pink noise file itself.  Notice the fairly flat response across the 1600-8000 Hz range.

So, now the process began of trying to use my graphic EQ to adjust for this non-flat response.  I set the left and right channels independently of each other.  I first panned the playback hard left and set the left graphic eq sliders until I could not make it any flatter compared to that relatively flat section from about 1600 Hz to 8000 Hz.  Then I repeated that for the right side; first panning hard right and setting the graphic eq sliders, again shooting for the response to match the level in the 1600-8000 Hz range.

This is about as good as I could get in the time I allowed myself, which was an hour or so (I can really nerd out on this, but I want to get to using these monitors for mixing, not just playing with 1/3 octave analysis and pink noise).

After EQ

If I spent more time with this, using some of the other signal files in the zip file from Dynaudio, which have single band pink noise, I could probably dial this in a little closer than what I achieved here.  But listening to some pink noise itself, and some of my favorite recordings for checking listening systems, I am really happy with what I have right now.  For those interested, here’s a photo of my EQ settings I used to achieve the above.

graphic eq result


For those of you more visually inclined, here is a graphic I drew on a whiteboard which has the basic elements of the signal setup to ‘pink’ a room using a computer, pink noise file, 1/3 octave analysis plugin, audio interface, graphic eq, and a measurement microphone.

overview.jpg


Now if you are still with me – and I don’t necessarily expect that you are – let’s get into some slightly nerdy acoustic treatments and tools that I’ve gotten lucky with and that are intentionally put in the room.

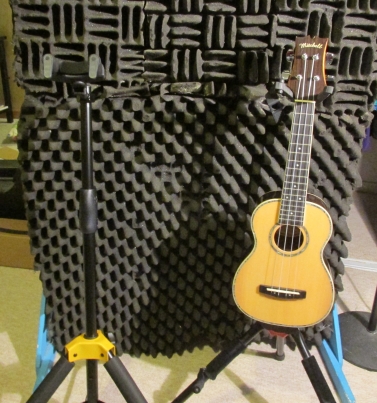
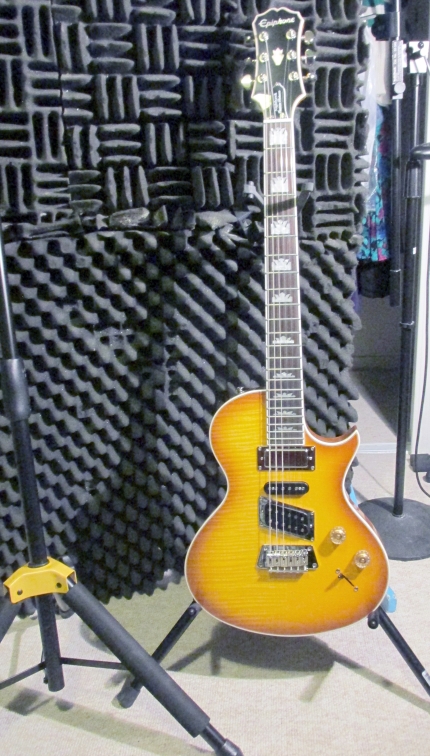
First, is the only piece of custom furniture my wife and I have ever had made – The Murphy bed in this room.  When it’s folded down, it’s a bed for guests.  When it’s folded up, I get lots of floor space for guitars and basses and whatnot on stands, and it becomes a pretty decent diffusor of low frequency.  Oh, when it’s folded down, it’s quite a bit of mid to low frequency absorption.

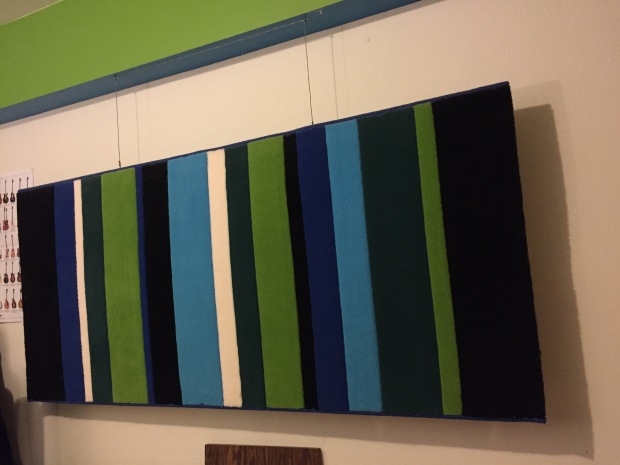
In the photos of the Murphy bed, you see what looks like a green horizontal stripe.  That is actually a drywall enclosure of the main I-beam that holds up the house.  What it provides is a break-up of that whole corner in the room, as well as a place to  hang my flutter controller – the multi colored stripey wall hanging.  I built that out of 1″x2″ material and the stripey thing is actually a throw-rug from IKEA, which I liked for the colors (had the paint matched).  Here you can see it a little closer.

flutter control


The surface of the rug is about 5″ from the wall.  The backside of the rug is what I would call open weave.  There’s no thick glue or rubber backing.  I have also started to staple open cell foam to the frame work on the back side of it.  Here’s a shot of the back side.

back side of flutter control - adds some absorption

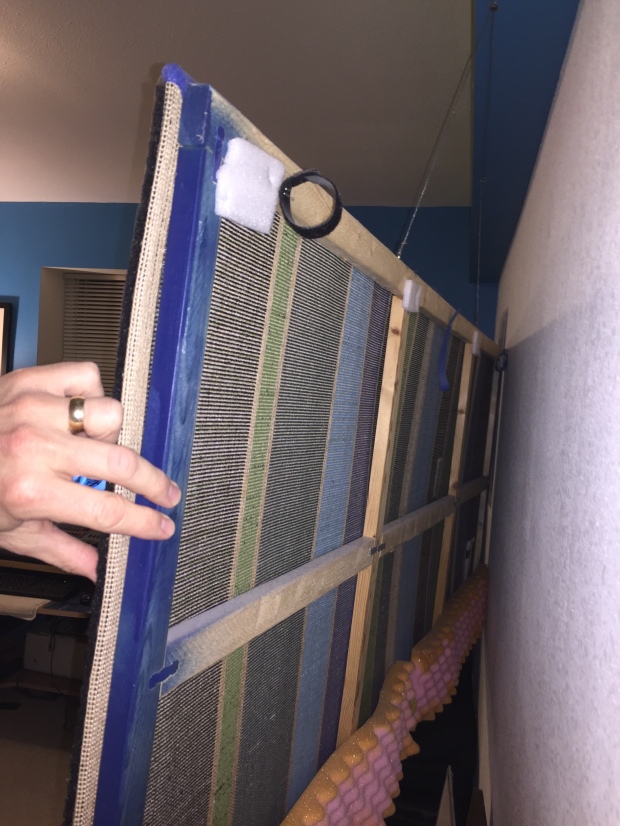
The velcro cable ties you see stapled held a rope light at one time, but it didn’t look as cool as I hoped so I pulled that out.  Now, why hang this out away from the wall instead of mount it directly to the wall?  Well, by putting out a distance, it actually can achieve more absorption than if it was hard onto the wall.  The sound that makes it through the rug and hits the wall bounces back primarily to the rug; losing some energy in the double path and gets cut down even more as some of it makes its way from teh back of the rug to the front.  The rest bounces back to he wall, and loses more energy as it then bounces back to the rug, some more gets absorbed, and so on.  This thing is REALLY effective at killing the flutter echos in the room.  There’s absolutely no perceivable ‘ping’ in the room when you clap your hands in the room.

On to the next lucky thing.  This is a room that is in the basement of the house.  Remember we talked about that I-beam above?  Well, that I-beam also divides the basement from an HVAC routing standpoint.  This room has no forced air inlets or cold-air returns.  I didn’t design it this way, it was the way the house was set up by the prior owners.  Lucky break.  In our last house, I had a room built in the basement with all kinds of work (double wall construction with different thicknesses of drywall for each wall), heavy solid wooden door with gasket sealing, etc.) but I also had HVAC routing in/out of the room, and that flanking path almost defeated all of the work on isolation and mass damping I put into the room to begin with.  This is a much better room, with no intentional design elements other than what I have added.  Only issue – it can get kind of cold in the winter.  Space heater to the rescue.  Remains nice and cool in the summer.

Next lucky item: the closet.  This room has a double-wide closet with sliding doors, and I can open up one of the sliding doors to serve as a back-wall for a ‘vocal booth’ of sorts.  It’s stuffed with our winter coats and extra pillows, comforters, etc.

I have built a standing ‘wall’ from more 1″x2″ and 2″x2″ material, stapled another one of those IKEA rugs on the back side, and on the front side, I have a bunch of 3″ acoustic wedge foam scraps that I scavenged from the scrap heap at my old employer where I worked in the noise & vibration lab glued to a piece of paneling.

I set this at an angle to the open closet door, and do all my mic recordings in that little triangular space.  Really quite dead there.


So there you have it.  If you have any questions or comments, hit my contact link and I’ll try to respond in a reasonable amount of time.


Battle of the Stands!

Today we have a cage-match between two different guitar stands; and how well they do what they are designed to do.

Contender 1: Hercules GS415-B

Contender 2: Ultimate GS-200

Their task – to see how safely and conveniently they can hold a variety of stringed instruments; from Concert sized Ukulele, to 5 string bass.  They will be judged on ease of use, safe contact with the instrument, and access to the jack for each of these instruments.  There will also be a crude evaluation of their overall packed down size and convenience of transport, as well as price.

Task 1: Concert sized Ukulele

Up first is the ukulele in the Hercules stand.  Hangs from headstock fine, doesn’t have any major pressure points on the body of the uke.

uke_herc

Next is the ukulele in the Ultimate stand.  Headstock fits fine, but the back of the body of the uke interferes on the un-cushioned vertical part of the stand.

uke_ult

Winner by a small margin: Hercules


Task 2:  Classical Guitar

First up is the Hercules stand.  The neck at the nut of classical guitars is wider than most other guitars and it was a bit of a challenge to get the classical to nest nicely into the Hercules yoke for it’s auto-lock feature to engage.  As pointed out with the arrows, it barely fit into the yoke.  If you needed a quick grab of the guitar or placement of the guitar onto the stand, the Hercules might not fit the bill.

class_herc

Now to place the classical into the Ultimate stand.  No issues with the neck/headstock fitting the v-shaped yoke of the Ultimate stand, but there’s perhaps a bigger issue – the Ultimate stand arms impinge on the body of the guitar right at the side/top binding area.  Not the best place to have a pressure point.

tclass_ultclass_ult_arm

This classical guitar has a pickup system built in, with the jack mounted on the south-side of the body.  Neither stand interferes with the electrical jack.

Winner: Tie


Task 3: Steel String Acoustic Guitar

First up again is the Hercules stand.  No issues for fitting the neck into the yoke and the yoke arms wrap conveniently around in front of the guitar without placing pressure on the strings

larry_herc

Placing the acoustic into the Ultimate stand is no issue up at the neck.larry_ultLarry_ult_arm

Here we see the issue again with the arms on the ultimate stand putting a pressure point on the side/top interface of the body.  The ultimate stand arms will fold up against the body, but this acoustic has an end-pin jack and the yoke for the headstock is not high enough to keep even a right-angle plug cable from hitting the floor if the arms are folded up.

Winner: Hercules


Task 4: Electric Guitar

Here is the guitar in the Hercules stand, no issues with the neck/headstock working as intended with the Hercules yoke, and no issues with access to the jack.

Epi_herc

Putting the electric into the Ultimate stand is no issue as well at the headstock/neck area.

epi_ult

However, when we look at where the arm ends up relative to the jack, we see a problem:

Epi_ult_jack

There is a slight interference of the arm with the output jack location.  With a right-angled plug brought over and trapped by the strap (like many like to do) the problem would be even worse.

Winner: Hercules


Task 5: 4-String Electric Bass, P-style body

No issue fitting the bass neck/headstock into the yoke properly.

sx_herc


There is an issue with where the output jack is located relative to the cushioned leg.  This could probably be solved with lowering the yoke height slightly, or using a right angled plug.  The extra observant probably notice the pickguard screw missing.  That’s a story for a different day!

sx_herc_jack

Same bass in the Ultimate stand has no issues fitting the neck into the yoke.

sx_ult

However looking at the location of the jack and arm, “Houston we have a problem.”

sx_ult_jack.jpg

Winner: Hercules


Task 5: 5-String Electric Bass, Ibanez SR style body

No issue fitting this bass into the Hercules or it wrapping around the headstock correctly.

Ibby_herc.jpg

No issue getting the bass into the Ultimate stand either, and because of the unique jack orientation on Ibanez SR style basses, neither have issue with access to the jack.

Ibby_ult

Winner: Tie


So in the challenge of which stand fits the most guitars in my collection, Hercules wins hands down.


General categories:

Portability – Here you see the Hercules (which when packed down to smallest size requires removal of the vertical part of the stand, and the Ultimate, which folds up and locks in place with a big orange plastic lock.  I like the way the ultimate stand snaps in place with the orange lock knob (just don’t have your picking hand fingernails anywhere near the stand when you lock it in place – you can snap fingernails off – I have personal experience with this.  Winner: Ultimate

size_packed_down

Price:  Hercules is roughly $44, Ultimate is roughly 30$.  Winner: Ultimate


For my needs, the Hercules is my choice and why I purchased it.  What I should have done a few years ago, is buy a different model Ultimate stand.  There is a model called the GS-100, that is more similar to the Hercules.  Interested readers might want to check that one out.

I hope that you’ve found this comparison useful if you are considering either one of these stands.  Both are well built.  I just should have bought the GS-100 when I bought the Ultimate GS-200 stand a couple years ago.


Swan Neck Injury – A Fix

Swan Neck Injury?

This is what happens when you have hurt some of the tendons in a finger and it can look like a swan’s neck when you put pressure on the end of it.  This is a bad thing for a guitar or bass player.  In my case, it’s the little finger on my fretting hand.  The farther away from my thumb that I have to fret with my little finger, the less force it can support naturally.  The injury looks like this if you push directly on the end of the finger:

35109797754_1b5e505436_k

What happens when you try to fret with that finger, is it will just not support any force.  This injury occurred when I was catching a basketball pass and the ball hit my little finger straight on.  Hurt like you wouldn’t believe for that day, then pain seemed to subside and the bruising went away and I didn’t think about it.  For years.  Didn’t affect my guitar, bass or keyboard playing.  Until……our worship pastor wanted to do The Meters Cissy Strut for our welcome in song; and I was on bass that week.  There’s no way to play this song on bass and have it sound right, without a pretty long pinky stretch.

So I finally saw a doctor for this.  Their solution was to make a splint out of some thermoplastic there in the office.  It was great, because I walked out of the office with something that actually supported my finger and let me fret and play that song.  Here’s what their solution looks like:

35949734975_f93c96180c_k

What you can’t see is that right about where I would wear a ring on that finger, part of the thermoplastic wraps under my finger.  That’s where the force is being supported.  It works but it’s kind of uncomfortable and doesn’t feel super sturdy.  I also wanted to support the finger in a little more of a tight angle than what this splint allowed for.

I’m an engineer by vocation and by God’s wiring of my brain, and I know how to do some 3D Computer Aided Drafting (CAD) modeling, and knew that our local library has some 3D printers.  So….Time to get modeling and print something a little more elegant.

I made my model by using an on-line CAD software called OnShape .  OnShape was started by some folks that came from Solidworks, and the software has a similar workflow and feel as Solidworks.

I made the model by holding my little finger on a pad of paper, at the curvature I wanted to make the splint hold, and traced around it.  Then I make some indications of where the joints were, then measured the cross-section thickness at the joints with some cheap digital calipers I bought at Harbor Freight Tools.  Then I used that data to model my finger, and ultimately my more cool looking splint in CAD.  I also wanted to get the splint to support out past the last joint near the fingernail.  Here’s what the CAD looks like modeled up without all the dimensions:

35561247150_797c12ef78_o(1)

Today, I finally got a chance to print out my masterpiece at the Library on a Makerbot 3D Printer.  Here’s a shot of my print happening (the item in the foreground is the splint I ended up using – it was my original design scaled up 10%; behind that is the original, and the item on the right is a replacement knob I was printing for my Behringer Bass V-Amp Pro.)  The print job is about 1/4 of the way done; and the splints are being printed upside down with a bunch of supports that look like little girders in there.:

35106459624_4c62aea913_k

Once it was all said and done, I had a splint, but it was pretty coarse and needed some fine tuning, which I did with a Dremel tool.  Here’s the cleaned up version (still pretty coarse, but it works) and the splint on my finger.


The splint, and the original from the Dr.’s office are now in my bass case.  I will be printing a couple more of these, one to put in each of my guitar cases and another one for safe keeping in case I lose one of those.

Update:  Trying to print on a different printer with a little better material with a higher melting point – so I can sand it without melting it.

Reverse Arranging

There are great resources for learning parts to songs these days.  I’m guessing that just about everybody who is reading this article has used YouTube lessons, chord charts available on-line, etc. to help themselves learn an unfamiliar song.  One of my favorite sites is worshipartistry.com where now they have hints and tips for acoustic and electric guitars, bass, keys and drums for many popular worship songs.

But what do you do if you can’t find any useful resources, and you just have lyrics and chords?  How do you know what to play and when?

Starting with the last part of the question – when, is just as important; maybe more important; than what to play.

What I call ‘reverse arranging’ is actually a pretty simple task, but somewhat time consuming.  It involves listening through the song and concentrating very specifically on each instrument’s part in the song, and taking notes for each song section for each particular instrument.  When I do this, I try to start with instruments that I’m NOT playing that particular week.  Why do those instruments first?  Well – here’s my logic; and I’m not saying it’s bullet-proof logic; listening to all of the other instruments first helps to train your ear to what the rest of your band is doing.

Now, just listening through what all of the other instruments are doing first is just a part of the job – writing notes out as to what those other instruments are doing is also important.  Doing this will help to train your ear for cues as to when you come in and drop out.  Do this for each section of the song, and for each unique instrument or part.  You might be the sole electric guitar player and being asked to cover a Hillsongs tune where there are 3 or 4 or maybe more distinct electric parts in the song.

This process of listening through the song, specifically for an instrument and what it is playing and when and with what kind of a style, is ‘reverse arranging’ or perhaps ‘reverse producing’ the song.  Eventually, you will get to the part you are supposed to cover – and if it’s covering 3 electric guitars, having this all written out will help you to decide for each song section which of those parts are absolutely necessary to communicate the feel and purpose of the song.  Jason Houtsma at Worship Artistry does an incredible job of distilling multi-guitar parts down into the essential.  He’s not doing this the first time through the song.  He has reverse arranged the song to some extent to figure out what the essential parts are that can be covered by a single guitar player.

When I do the reverse arranging, I make sure I have a clear hour ahead of me before getting started.  That’s usually enough time to really get my ear to break down the song and listen for key parts as well as pick up on some of the fine detailed nuances for each of the parts – the production ‘sparkly-bits’ that also serve the purpose of the song.  To take the notes, I use a spreadsheet, a pretty nerdy way to break down the song, but hey – it works for me and you might find that it works also.

At the top couple of rows of the spreadsheet, I have a listing out of the song title, a reference YouTube link or other reference to the specific song, with the following rows each belonging to a section of the song – and I write it out linearly – meaning each chorus run through gets it’s own row.  Columns belong to each of the individual tracks/parts.

I write out cues that I hear, not necessarily musical notes, but for example, if I’m playing bass and it’s just single plucks with held notes for each of the chord changes, then I will write a tip to myself – ‘on chord movement only’ or something to that effect.  If it’s playing 8th notes, swing, etc. I’ll leave those tips to myself.

I call this a ‘song map’ because it’s my guide to where I need to go and where to turn, where to stop, go fast, etc.

Ok, enough talking about it, this is a link to an example song did for Bethel Live’s version of “This Is Amazing Grace”.

I do some songwriting and home recording, and doing this for songs has really helped me also not ‘over arrange’ by taking cues for how much various parts are NOT playing.

If you have found this to be useful, or have some other way to decide on how and what to play (or record), please leave me a comment or send me an e-mail.


The Boxes

A few years ago, I took the excellent free course on songwriting from Berklee College of Music through coursera taught by Pat Pattison.  The class was recommended in a couple of different music forums I participate in so I thought I would give it a try.

It was a challenging course and hard to believe that something that has turned out to be so valuable to me over time, was free.

One of the concepts that Pat teaches is something called ‘The Boxes’.  What he is referring to is that it is good practice to try to develop the concept of your song by introducing the concept in a somewhat small scope to begin with; a small box; then expand upon the idea in the next part of the song; a bigger box that the first idea fits into; and then somewhere in perhaps the bridge or a big chorus, introduce the biggest box with the largest representation of the idea that the two previous ‘boxes’ can fit into.

This goes against human conversational nature, where we want to blurt out our biggest ideas and then cover the details.

However, when telling a story, or a joke or when writing a song, revealing the big idea first or the punch line first, just doesn’t work.

I recently heard a quote from C.S. Lewis’ “Mere Christianity” which compares our lives to those of tin soldiers where God works on breaking through our tin exterior to help us become fully alive and that the parts of us we don’t want God working on are those that are still tin.

What a grand concept and idea for a song.  I wanted to write a song immediately about it.  The next day I began work on it and remembered ‘The Boxes’ and tried to write out some boxes, knowing that I wanted to keep that last main point – the unwillingness to change, as the final big box; maybe even the final words of the song.

I tried out some ideas for boxes:  Metals, God pushing and bending, our dislike of the pushing and bending.  But I couldn’t make them fit into a small, bigger, biggest idea kind of hierarchy.  They were all kind of part of the biggest box.

So I scratched those and thought of the idea of a tin soldier to begin with.  What is done with tin soldiers?  They are played with.  OK, who plays with them?  Children.  Well, children are small, maybe that’s my first box – what it looks like when toy soldiers are played with.  Maybe flesh that into a verse or two.  Make ample use of rhyming dictionaries like the dillfrog and McGill online resources.

What could be a bit of a bigger box – how about ‘how’ toy soldiers are played with once they are set up?  Yes, that might work – so that became my pre-chorus and chorus and some of a 3rd verse.  Work on some words and rhymes; all the while keeping that big idea for the last box.

The last verse, there I can bring home this big idea of metal being bent and reformed and how God does that in our lives, and how we resist.  I decided to also just end on that idea and not go back to the chorus.

The Boxes really worked for me to hold back on that big idea until it had been properly set up.

I normally write my own music for my lyrics, but this time I offered them up to a person that I wanted to collaborate with because I enjoy his music.  He listed Nada Surf as a band influence and I like their music and asked if the lyrics inspired him.  He took the lyrics and ran with it.  I only had to write a chorus melody and record the vocals.

Here’s the final result in song (Click to hear the song on SoundCloud):

Tin Soldier  – Copyright 2016 Scott Lake

Verse 1

First child of many, often playing alone.

Rug as mountains and valleys, spool of thread serves for a throne.

Artillery down the hallway, Cavalry under the bed.

Infantry stands in formation, some of tin and some of lead.

Verse 2

Each stands at attention, with gun or sword in hand.

Proud though without motion, even though under command.

Someone must now move them, no movement on their own

The boy will give them action, outcome yet unknown.

Pre-Chorus

Move one here, move one there.  Will the army get anywhere?


Chorus

Toy tin soldiers, toy tin men.

Toy tin soldiers, motionless yet again.

Toy tin soldiers, toy tin men.

All these soldiers, will they yield their shells of tin?


Verse 3

If they are to get into motion, they have to lose their tin

To serve the grander purpose, they need a soul within.

The Master brings their life force, picks where He begins.

To bend and break and yield them, to inject His life therein.


Prechorus repeat

Chorus 2

Toy tin soldiers, toy tin men.

Toy tin soldiers, motionless yet again.

Toy tin soldiers, toy tin men.

All we soldiers, will we yield our skins of tin?


Verse 4

Heat and force and pressure, breaks and tears and bends.

Love and loss and story, redemption from our sins.

I am one of the soldiers, pushing out dents in my skin.

Preserving my false protection, the part that still is tin.


Playing and teaching “Up”

We have a new worship pastor at our church.  This past week, he took time out of his crazy week of learning the ropes at a new church and planning out services, etc. to go over some upcoming songs one-on-one with me.  It was quickly apparent that his abilities on electric guitar far outpace my somewhat pedestrian licks and tricks.  I’m thankful for the relative simplicity of electric guitar parts on a host of today’s modern worship music.  I’ve not had terrible difficulty covering the gamut of Hillsongs, Bethel, Jesus Culture, etc.  But our new pastor likes to throw in some Israel Houghton and New Breed like funk.

Example

I can play that stuff on keys, but he wants me to cover some of the funk on guitar.  It’s not like he was asking me to do something that he couldn’t do, in fact – BAM  – he was showing me the various parts right there – and not in a sloppy fashion; straight up funk right off the song.  Several things passed through my mind from “Whoa, I can’t play that!”, to “I hope he isn’t disappointed when I tell him that I can’t play that” to “I’m not sure I can learn how to play that.”  The fact of the matter is, that I’ve faced this situation several times before, and only when I’m challenged to do something I currently am not able to do, have been the only times when I’ve had to do more than just typical practice and get some new skills under my belt.

When those changes have happened, they have involved someone willing to take the time to show me the way.  To honor their time, I’ve put in the time to try to learn what they’ve shown.

This playing ‘up’ to the challenge has another challenge – to teach ‘up’ to someone that is maybe not currently schooled on some tricks and helps and methods that you might now have as muscle memory and brain stem activity.  You didn’t get to that point of ease without someone or some lessons helping you along the way.  Be willing to play up to the occasion as well as teach others to do the same.  I’m writing this almost as a self-pep-talk, but I look forward to the other side.

3 strings for the King

Admittedly a very cheesy title.  However, this is the title I’m giving to a valuable lesson I learned playing electric guitar in a previous church worship band.  The well-trained and truly talented electric player in the band and I were both assigned electric guitar one week.  At that time, I was all about using all 6 strings.  The other player got frustrated with that and in the rehearsal he admonished me for using so many strings.

He then proceeded to show me that I really only needed to use typically 3 strings at a time in my rhythm playing and very rarely use the bottom two strings as a modern worship band electric guitar player.

I had been a mostly acoustic player in the band and the ‘strum-em all’ approach worked to an extent, but just did not translate well to electric in the band setting.

It was a watershed moment for me and changed my playing style for the positive more than any other comment/lesson/instruction/video had ever done before.

Today, I visited Troy’s site: Guitar for His glory and one of Troy’s lessons gets right to this point – his lesson on inversions is valuable for anyone wanting to get out of the open chord rut and progress to a mix of rhythm/lead that is so typical in modern worship songs.

Get out of the boat…..

In Matthew 14, there are some major stories in the life of Christ and the disciples. The chapter starts out with the death of John the Baptist at the hands of Herod after making one of those “I’ll do anything for you” type of promises. Then Jesus does one of the most mind blowing miracles of provision with feeding the five thousand, and then the miracle of Jesus walking on the water (and Peter as well) and culminating with Jesus healing through direct and indirect touch of Jesus’ cloak.
Of all the disciples, Peter is often criticized for his lack of faith. About 10 years ago, I started sympathize with Peter and felt like he was getting a bad rap. After all, he’s criticized for denying Christ 3 times (but where were the other disciples?) and he’s looked down upon for starting to sink AFTER first asking Christ to invite him into what Christ was doing at the time, and then…..stepping out of the boat ONTO the water.
Our pastor preached on this topic this morning and pointed out a few things:

1. He mentioned the whole thing about Peter getting a bad rap – after all, where were the other disciples in the boat while they all thought they saw a ghost? He thought perhaps they were all huddled at the back of the boat scared nearly to death. Not Peter – Peter asks Christ to invite him out onto the water. Peter doesn’t ask Christ to make his identity as Christ any more tangible by walking over to the boat and climbing aboard, or any other suggestion that could have still alleviated their collective fear. No, Peter asks one of the most crazy things he could have asked – let me walk out to you, Jesus if it’s really you. Is there any more nuts question asked of Christ in the entire Bible?

2. Our pastor pointed out that Peter’s faith was strong, but it’s when Peter started depending on the strength of his faith, rather than the Object of his faith, that Peter ‘failings’ begin to show up. He calls out to Jesus to save him, which Jesus does. It seems like Jesus is calling out Peter in front of everyone else, saying “O you of little faith, why did you doubt.” However, our pastor said that what Jesus was really pointing out is that ALL of our faith is little, and even Peter, one of the “sons of thunder”, who had HUGE faith – faith which Jesus would point out would be a basis for the church itself – was still little. It’s down to this, the size of our faith is not what matters, it is the object of our faith.

A. w. Tozer points out in “The Pursuit of God”, that faith is down to the practice of looking to God in any and every situation in the chapter called “The Gaze of the Soul”, where he points out that directing our attention to God, and off of ourselves, is the ‘essence’ of faith. Timothy Keller, in “Walking With God Through Pain and Suffering” talks about one of the practices of deepening faith is to preach to ourselves about the truths of God and His reality. David does this often. Note how this concept meshes so perfectly with Tozer’s comments about faith being directing our attention to God. You cannot declare the truths about God without directing your focus on Him as well. The two are inextricably linked.

So, how does this all relate to being a Worship Band Wingman? Perhaps you are currently in a worship band, and you are relying heavily on your own skills and practice (both necessary elements of successful leading), and you’ve taken your focus off of Christ and his provision? Perhaps you are just considering the possibility, and you’ve talked yourself out of it.

If God seems to be calling you to participate in a worship band, or start one, or try some new aspect to your wingman responsibilities – ask Him if you can join in His work, and don’t over-analyze. Keep your focus on Him, and don’t focus on your own abilities. Take a lesson from Peter – he knew that he couldn’t walk on water, he had spent his life needing a boat to stay ‘on’ the water. He didn’t let that get in the way of asking Jesus likely the craziest question in his lifetime, and then when Jesus simply said “Come”, Peter got out of the boat amid the storm.

Maybe it’s time you need to ask God if it’s time to get out of the boat. Listen for His gentle voice amid the storm saying “Come”.

Writing songs? Here’s 10 tips to help you self-critique

I write songs as a hobby, usually concentrated in the colder months of winter.  I recently hit this link at BMI which is a pretty concise list of ways to effectively self-critique songwriting.  These tips can apply to any kind of song, including music intended for personal or collective worship.  In fact, for some of the tips, it’s even more important to concentrate on these points – such as tip #3 “Are your lyrics singable?”.  With songs that are meant to be sung collectively, this one tip is very important and for whatever reason, seems to be getting laid aside with some trends in modern worship music.  If the goal is to have the collected souls in a space bring an act of worship to God, driven through lyrics, then having singable lyrics should be central to that goal.

Black Holes – or not?

Well, whether they exist or not seems to be now a question.

We all are trying to explain our existence.  This is an interesting development in the world of theoretical physics – Black Holes, taken for granted to exist for decades by the best astrophysicists in the world, now perhaps do not exist after all.  As a Christian, I am not going to cast ‘told you so’ looks to Hawking and others, but sympathize with them.  I believe we all are trying to explain why and how we are here.  This recent revelation by the scientific community simply sheds more light on why I choose to believe the unbelievable God, and that I have to continually check in with that belief.  What I mean by this is that if I could fully explain God and His creation by my puny human mind, or even by believing what our collective puny minds could conceive as explaining our universe as the end-all, be-all, well, that’s a sad end to existence is it not?  I choose to believe in a God that is unexplainable, who can create in ways that our collective humanity could never hope to explain.  This God, who I believe spoke the universe into existence, could surely do it in ways that confound our minds, could He not?  If He could not, then I don’t think He is worthy of worship and awe.  But if He can, that is, create and redeem in completely unexplainable ways, then my friends, He is worthy of my worship and awe and gratitude.  My heart’s longing for something beyond this world and beyond explanation – C.S. Lewis stated that longing is evidence of the existence of God, and that surely resonates with me.  Lewis was certainly much smarter than I am, and in his words I find both mystery and surety.  I’m also thankful for scientists, who are trying their best to explain existence by formula and theory.  Ultimately, I am thankful for a God who breathed and all was so, and who is so incredibly creative and mysterious, and majestic.  To me, a Being such as this is worthy of my devotion and worship, respect, fear and love.  This is a bit more important than learning the right guitar parts for the next new worship song our team will bring to our congregation – it’s at the back of it, and that’s pretty serious business!